Introduction
Ability to carry out simple image editing quickly is very significant in making our images “fit for purpose”. If you do any of the following with images: use them in online publishing; email them especially if recipients have Inbox restrictions; put them on websites and find they take a long time to open/download; use them where image size on the page is important; save them where storage capacity is limited. Then you need to know some basic image editing techniques and have access to simple tools for doing this. So that you can resize images easily to suit their purpose.
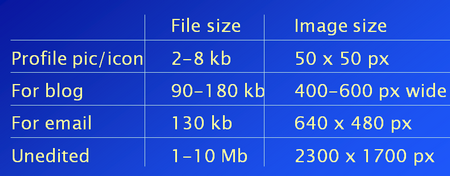
The table above gives a rough guide to sizes, but experience will tell you what sizes work best for you in your own context.
A suitable editing application
My own personal preference is a free downloadable tool called PhotoFiltre.
From my perspective the main advantages of this particular tool are these:
- Small (4MB) so I can keep a copy on a USB drive to put on any computer at need – useful if you don’t have the access to download and install executable files on school/college computers due to organisational restrictions;
- Free to download and use for private and education purposes so it can be installed anywhere without licensing issues;
- I can recommend it to colleagues and students who can then use it without incurring cost; and also without large download time – significant in our infrastructure poor region;
- My often not very tech savvy students, and sometimes colleagues, find it easy to use;
- Simple short user guide – mostly written in plain comprehensible English
- Quick to open and to access the tools I (and many others) use most frequently
- Handles a good range of image formats
The main PhotoFiltre tool that I use is “Image size” to adjust the size of my images. However I do also regularly use: “Paste as new image” – extremely useful for screenshots used in “How to” resources; and “Crop” – to produce an image without extraneous clutter.
Adjusting image size
For me the way that I can easily and quickly resize an image is probably the most important feature of PhotoFiltre. Accessing the Image size” tool is most easily done via the “Image” menu at the top of the screen.
Resizing by reducing the number of pixels is probably the quickest and easiest way for most of us to reduce the size of the image file.
Making sure that your image is the right size for purpose is critical. When you import an image into a document and reduce the size within the document this has no effect on the size of the image in terms of file space. For example if you have a 60KB text document and you insert a 500KB image your document file size will be 560KB. Even if you reduce the visible dimensions of the image within the document your file will still be 560KB. This has impacts on download time and inbox capacity. Both “png” and “jpg” are widely supported.
Image saving format
The default file saving format on installation of PhotoFiltre is “bmp” (bitmap). This format is less widely used than in the past and therefore no longer supported by a number of commonly used tools and applications. This makes it a good idea to change the default file save format to “png” or “jpg” as shown below.
Conclusion
I hope you find this introduction to getting your images fit for purpose to be helpful. You could find it especially useful of you are planning an article for this newsletter. If you can submit your images already resized it saves us time in editing and contributes considerably to the smooth and timely publishing of the newsletter.
If you have any questions or comments about image sizes please put them in a comment on the post and I will do my best to help.
Jo Hart (Aug 2012)


