CGEA is now reaccredited until 2018!

The Certificates in General Education for Adults (CGEA) 2013-2018 is here at last.

As we expected, there isn’t a lot of change mostly adding digital literacy into the reading and writing stream. There are also some changes to elective rules and a welcome attempt to reduce the problem of tedious and repetitive assessment.

But, of course, there are all new numbers:

  • 22234VIC Course in Initial General Education for Adults
  • 22235VIC Certificate I in General Education for Adults (Introductory)
  • 22236VIC Certificate I in General Education for Adults
  • 22237VIC Certificate II in General Education for Adults
  • 22238VIC Certificate III in General Education for Adults

The courses are accredited for the period 1 July, 2013 to 30 June 2018.

The curricula can be downloaded from the Victorian Training Support Network

NOTE you will need to scroll to the bottom of the list to find the NEW CGEA.

Also NOTE that as previously ALL the curricula are bundled into each of the five differently named documents. This means that you  only need to download ONE of the docs. There are separate executive summaries for each qualification.

New national unit numbers can also be found on the TGA website – enter the National course number in the search box. At the time of writing this the courses were designated “Non-current” as the course become the current course on July 1 2013.  From this date all new students will enrol in the new qualification. Current students can continue to complete their qualification requirements according to the CGEA 2007-2013.

WA numbers have been assigned and are now available from VETinfoNet.

We will be sharing the work of identifying changes in the ALaN Network Google Group. For a start there is a PowerPoint (available in the Group) from the curriculum maintenance officer at Victoria University. If you find anything that you think other CGEA teachers should know about regarding the new curricula then please post in the GoogleGroup.

New online numeracy resources

‘Building Strength with Numeracy’ revises and improves on the iconic numeracy resources ‘Strength in Numbers’ and ‘Breaking the Maths Barrier’, and other ‘tried and true’ numeracy teaching resources developed by Beth Marr and other experienced numeracy teachers.

The new resource is a collection of activities that builds on and updates elements of the previous resources, as well as including many new, previously unpublished ideas, activities and student practice exercises.

The resource is accessible online for teachers to use in a range of settings. The activities and practice sheets span a range of levels and subject areas with some suggestions regarding links and sequencing. However, as with the previous resources, it is not intended to cover the whole of any particular curriculum or course.

It is intended that teachers select content relevant to the needs of their learners and integrate it into their own teaching plans in conjunction with other materials. For this reason it has been presented to enable users to download separate activities, single practice sheets or whole sections, as required. The resource is a work in progress in that not all sections of previous resources have yet been included. Hopefully these will be added in the future.

Thanks to VALBEC  for providing us this free resource based on all of the great work that Australians have produced about adult numeracy.

Lino.it for learning!

Introduction

There are lots of simple, fun to use, online tools that we can use to stimulate interest in writing. One of the simplest is “Lino”. This is a simple cloud based “sticky note” system – although it is certainly more than just a place to put notes. There are several of these available online including “Wallwisher” one of the early ones and the first one I used. However this article is about Lino and some creative ways to use it with students.

I like using online tools because they provide opportunities for students to write for an authentic audience ie someone other than their teacher/lecturer. This audience may be their fellow students or can be broadened out by sharing links more widely with students or teachers/lecturers globally.

Signing up and some of the fucntions

Signing up to Lino is very easy and your students don’t need to sign up to add to your canvases. Only users who intend to create canvases need to sign up. However students often sign up because they can use Lino for reminders, “to do” lists and taking notes.

There are a number of different functions available. You can drag and drop sticky notes of different colours or colourless ones and then add your own text to them. Images, files and videos from several video sites can also be included.

Once you sign up you get a Home Page with one canvas “Main” this gives you a run down on creating a new canvas adding stickies and also the other tools available for editing. You can use Lino as a memo and task management system but I have only used it for activities with students and as a contributor to Linos made by other members of my global network.

Lino.it creatively for student engagement

Lino is used by educators worldwide, with students of all ages and across a variety of subject areas. This example is from a school teacher based in Perth (I met him through my global network on Twitter and he has become a good friend both actual and virtual). He created a Lino for his students and other people across the globe to post ideas for World Water Day 2011. The response both within the school he was at and globally was huge! The Lino is embedded here – you can move around within it with click and drag. Also if you move your mouse to the bottom right hand corner you will see a thumbnail of the whole Lino.

I have used Linoit mainly for student feedback:

However it also works well for:

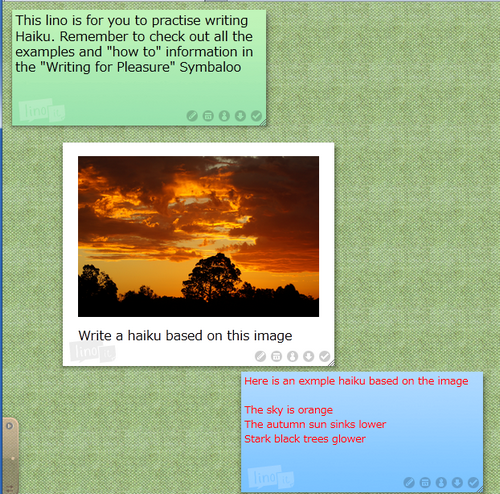
  • writing stimulus – with an image (and example) for a short piece of writing, I did one for writing a Haiku that was planned for use this year although this is now unlikely as my Institute has decided to cease delivery of CGEA;

As this will probably not be used with students I would be delighted if anyone felt they would like to visit “Write a Haiku” and add their own Haiku to the page 🙂

  • brainstorming ideas for collaborative work;
  • individual students – sign up and make their own for “to do” lists and reminders

 Conclusion

For me the two best aspects of Lino are: its ease of use; and the opportunity for students to create writing for others than just their teacher to read. I believe strongly that students in a face-to-face situation, a blended situation or entirely online as mine have been for the last few years must have access to technology in their learning. This not just because of the opportunities to write for authentic audiences but because they will need to use technology to survive in their future lives at work and at home.

Please explore and investigate and add your comments – would your students like this? Would you use it with your students? Do you already use it with your students – share your/their Linos?

Images “fit for purpose”

Introduction

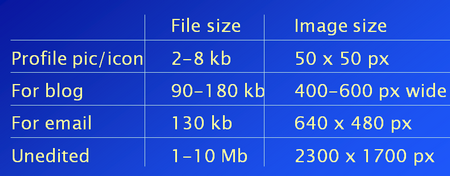
Ability to carry out simple image editing quickly is very significant in making our images “fit for purpose”. If you do any of the following with images: use them in online publishing; email them especially if recipients have Inbox restrictions; put them on websites and find they take a long time to open/download; use them where image size on the page is important; save them where storage capacity is limited. Then you need to know some basic image editing techniques and have access to simple tools for doing this. So that you can resize images easily to suit their purpose.

The table above gives a  rough guide to sizes, but experience will tell you what sizes work best for you in your own context.

A suitable editing application

My own personal preference is a free downloadable tool called PhotoFiltre.

From my perspective the main advantages of this particular tool are these:

  • Small (4MB) so I can keep a copy on a USB drive to put on any computer at need – useful if you don’t have the access to download and install executable files on school/college computers due to organisational restrictions;
  • Free to download and use for private and education purposes so it can be installed anywhere without licensing issues;
  • I can recommend it to colleagues and students who can then use it without incurring cost; and also without large download time – significant in our infrastructure poor region;
  • My often not very tech savvy students, and sometimes colleagues, find it easy to use;
  • Simple short user guide – mostly written in plain comprehensible English
  • Quick to open and to access the tools I (and many others) use most frequently
  • Handles a good range of image formats

The main PhotoFiltre tool that I use is “Image size” to adjust the size of my images. However I do also regularly use: “Paste as new image” – extremely useful for screenshots used in “How to” resources; and “Crop” – to produce an image without extraneous clutter.

Adjusting image size

For me the way that I can easily and quickly resize an image is probably the most important feature of PhotoFiltre. Accessing the Image size” tool is most easily done via the “Image” menu at the top of the screen.

Resizing by reducing the number of pixels is probably the quickest and easiest way for most of us to reduce the size of the image file.

Making sure that your image is the right size for purpose is critical. When you import an image into a document and reduce the size within the document this has no effect on the size of the image in terms of file space. For example if you have a 60KB text document and you insert a 500KB image your document file size will be 560KB. Even if you reduce the visible dimensions of the image within the document your file will still be 560KB. This has impacts on download time and inbox capacity. Both “png” and “jpg” are widely supported.

Image saving format

The default file saving format on installation of PhotoFiltre is “bmp” (bitmap). This format is less widely used than in the past and therefore no longer supported by a number of commonly used tools and applications. This makes it a good idea to change the default file save format to “png” or “jpg” as shown below.

Conclusion

I hope you find this introduction to getting your images fit for purpose to be helpful. You could find it especially useful of you are planning an article for this newsletter. If you can submit your images already resized it saves us time in editing and contributes considerably to the smooth and timely publishing of the newsletter.

If you have any questions or comments about image sizes please put them in a comment on the post and I will do my best to help.


Jo Hart (Aug 2012)


Do you (or your students) Toon?

Introduction

my students are all off-campus and so are using their own computers with widely varying software. Many of my students are also not particularly computer literate so expecting them to use sophisticated features of word processing or presentation packages is not an option. The strategy I adopt for a lot of work with my online students is to use mostly (though not always) online tools. This post is about using one of them – ToonDoo – an online cartoon making tool.

How do we use ToonDoo?

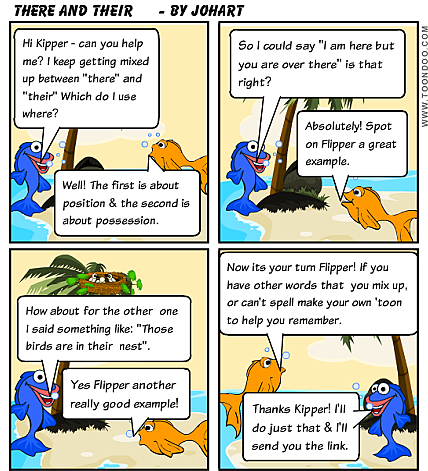
I have been using ToonDoo myself for several years to create occasional texts to engage student attention and to break up heavily text based resources.

Then about 3 years ago I first used it with online students when we created a cartoon together via virtual classroom (Elluminate). Each student was given control of my desktop in turn to add their own “bit” to the cartoon. These students then signed up to ToonDoo and made their own cartoons. I have also shared my use of ToonDoo fairly widely through webinars and associated blog posts.

Recently I have extended the use of ToonDoo with my students as part of my National Vocational E-Learning Strategy project Extraordinary Learning For A Digital Age (ELFADA) funded under the Partnerships for Participation initiative. This was part of a mini-project on digital safety. The students learnt about ToonDoo in a virtual class session through an Application Share demo and together we created a Toon. This was shared through the course blog in a post on visual texts.

The next step was for the students to visit a series of links to cartoons each addressing an aspect of digital safety. They chose some of these to review and evaluate.

Finally the students created their own cartoon choosing a topic from those they had learned about through our work on staying safe online, they then published a blog post with links to their cartoon, or with the cartoon embedded. These are two of the student posts,  Jordan’s looking at scams and some consequences and Meg’s with a warning to take care what you share.

Conclusion

I have found using ToonDoo to be a great engagement tool for students and will continue to use it with my own online students. I also find that ToonDoo is used easily by students across all three levels that I currently teach online. In common with many other online tools it is relatively simple to use – this is a huge bonus for online students who don’t always have a lecturer available for immediate help.

Please use the comments to share your own and your student experiences with ToonDoo or other cartoon making tools. Or if it is new to you let us know if you think you might try this with your own students.

Jo Hart

Numeracy professional development resource

Do you know the sorts of numeracy and Mathematics needed by your students in the workplace?  A new resource designed by Manufacturing Learning Victoria offers you a way to check your knowledge.

The publication is a free download: Numeracy. A professional development resource for WELL practitioners 

It is a professional development resource designed for Workplace English Language and Literacy (WELL) practitioners. You can also use it to  support the development and recognition of numeracy training and skills and knowledge consistent with the requirements of the Vocational Graduate Certificate in Adult Language, Literacy and Numeracy Practice.

Fitness & Sports resource

This week, I received the publication: Fitness & Sports A Resource for Literacy Teaching from the Southern Grampians Adult Education.  (NB if you are using Firefox the sidebar links may not work). This is the seventh in a series of learning resources developed for the 2007-2012 version of the CGEA.

Fitness & Sports contains 72 worksheets about sports in eight sections: Netball, Tennis, Cricket, Basketball and four types of “football”. These are developed at 3 different levels so mixed-level classes can share a common topic but do literacy and numeracy activities that develop and extend their current skills.

I am not a big fan of worksheets as the core of adult literacy programs. In my view, Death by Worksheet is as risky as Death by PowerPoint.  However, both worksheets and PowerPoint have a valuable place if not overdone; this resource models how experienced adult literacy practitoners weave them into a diverse program.

As all the worksheets are photocopiable (legally), this is an ideal resource to allow the sports mad student to demonstrate and extend their knowledge while providing evidence of competence against any part of the CGEA needed (including all of the core units and several electives). It also provides a range of ideas for class activities such as guest speakers, debates, and Internet research. A student who is really keen on this topic could complete a substantial chunk of any CGEA certificate using ideas included in this resource.

It cost me $75.00 plus pack and post. Order form here – if it doesn’t open then email sgae@sgae.vic.edu.au for an order form.

Other topics also available from South Grampians Adult Education include DIY Housing and DIY Cooking. See samples here.  These also demonstrate how a topic can be shared across the full range of CGEA certificate levels.

Cheryl Wiltshire

ALaN Network Coordinator

Issue 1 – Free downloadable resource – a wordsearch activity

Introduction

It falls to me (JoHart – one of the current ALaN facilitators) to “kick off” our “Free downloadable resource” feature that we hope will become a regular part of the ALaN Newsletter. The intention is to share a small downloadable resource in each issue.

We invite YOU to contribute  a favourite small Adult Literacy/Numeracy resource that you have developed. We hope that each feature will provide; context in which the developer uses the resource; the resource itself; one or two tips/ideas on how to develop/generate similar resources.

Today’s Resource

Currently I am teaching CGEA entirely online. However I find that many of the small resources (especially games and puzzles) that I used in paper form are easily adapted to the online environment, particularly things like wordsearches. Here is today’s resource  as I use it in Elluminate/BlackboardCollaborate.

Originally this was a WordDoc ” Wordsearch Activity 1” just click on the title to download.

I have  a variety of wordsearch puzzles and other similar activities that can be used to help students with spelling and or vocabulary. This is just one of a number that use one of the reading age type vocabularly lists to source a large number of appropriate words. I have created most of these activities using the free wordsearch puzzle maker on the Discovery Education website. The site has several other free puzzle makers and lots of other useful ideas and resources.

Please comment on the resource and share ideas you may have for its improvement, use or extensions of the activity.

Jo Hart